Why Do Dogs Hate Wearing Coats? And How Proper Fit and Velcro Can Help
Ever struggled to get your dog to wear a coat, only to face resistance and frustration? You're not alone. Many dogs aren’t fans of coats, and there are several reasons for this. However, with the right fit and velcro closures, you can make coat-wearing a more pleasant experience for your pup.
Adding Velcro to your dog coat is the key! In this step-by-step guide and video, you'll learn how to add Velcro to your dog coat with precision and care, ensuring a snug and adjustable fit for your furry friend. Whether you're a seasoned sewing enthusiast or just starting out, this guide will walk you through each step, from marking your fabric to sewing the final piece.
I am working on the Slicker/Alpine coat in this example. If you are interested in making this coat you can find the pattern here.
When possible, I use affiliate links to share supplies and products I've personally used and can recommend.
In this tutorial, we’ll go through the detailed steps of adding Velcro to your dog coat. This process ensures a snug fit and adjustable closure for your furry friend.
Before we begin, you'll need to gather some materials:
- Tailor’s chalk or a marking tool
- Velcro strips (I like to work with 3/4" to 1" width which you can purchase on Amazon)
- Ruler
- Your dog coat pattern
Step-by-Step Guide:


Step 1: Prepare and Mark the Coat
- Fold the Body Section: Start by folding the body section of the coat in half lengthwise and laying it flat.
- Determine the Withers Point: Place the body pattern piece on top of the folded body section. Use the measurement chart found in my Workbook Download to find the withers point on your dog (Measurement #2: Neck to Withers).
- Mark Your Pattern: Mark this point on your pattern (not your fabric) and draw a straight line down to create the withers line.


Step 2: Position the Tummy Panel
- Align the Tummy Panel: Fold the tummy wrap (the part that wraps around the belly) in half, aligning the arms. Lay this over the belly section of the body.
- Find the Velcro Line: Use a ruler to measure down from the withers line to the point where the tummy wrap portion meets the chest piece. This is half of your dog’s chest circumference (Measurement #4 from the Measuring Chart).
- Draw Velcro Line: Draw a line outlining where the tummy wrap lays on the coat, then draw another line half an inch inside this line. This will be your Velcro line.


Step 3: Measure and Velcro Area
- Calculate Velcro Coverage: Measure the height from the top of your Velcro outline to the coat edge. Multiply this by 60% to get the coverage area, round up to the nearest 1/4" (1/2 cm).
- Let's look at an example. Let's say my height measures 7 inches (17.75 cm). I would mutliply this by 60% to get a measurement of 4.25 inches which, I'll round up to 4.25" (10.75 cm)

Step 3: Measure Velcro Strips
- Determine Velcro Amount: Mark your Velcro area on your fabric. Then measure the width of your Velcro to get an idea of how many pieces you can fit into that area. Remember to leave a little space between each piece.
- Let's look at an example. Using the above example, I have an area to fill of 4.25" (10.75 cm). If using ¾ inch Velcro, I can fit three strips within 4.25 inches, leaving a 1-inch gap between each strip.


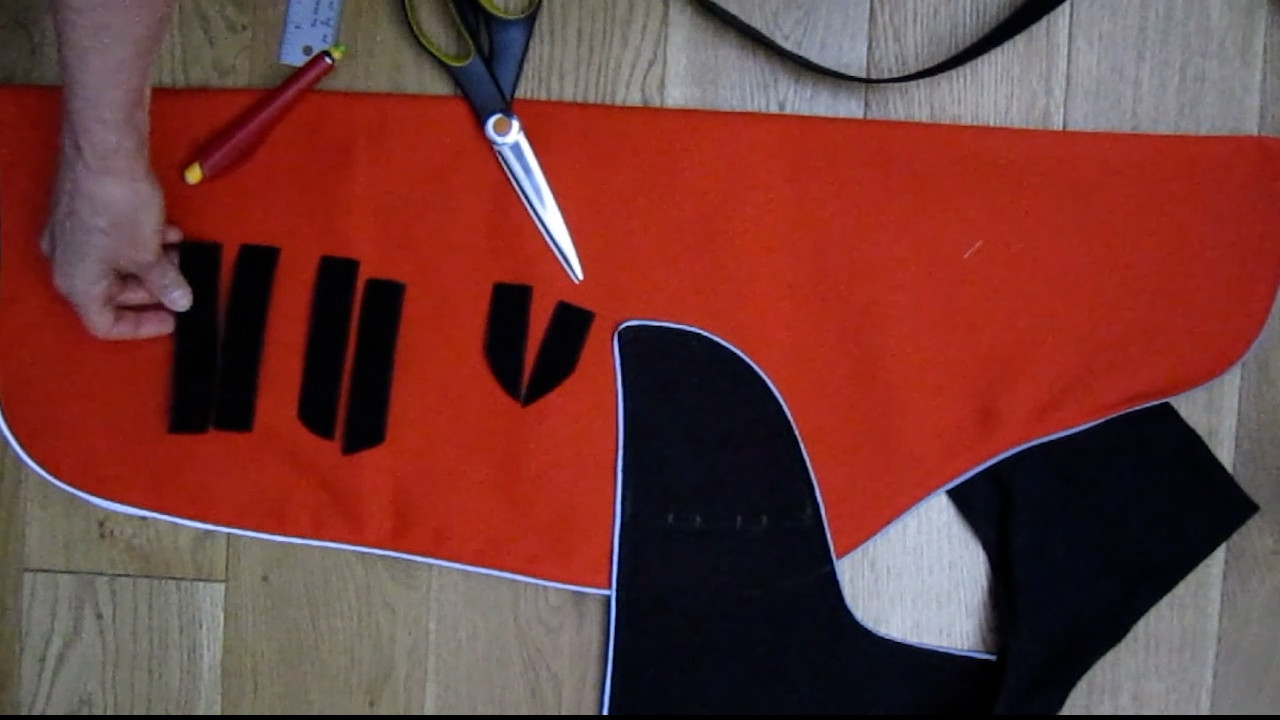
Step 4: Cut and Place Hook Side Velcro
- Prepare Hook Side: Lay out the hook side (the rough side) of the Velcro on the outside of the coat . Position the strips to run sideways, ensuring the bottom of the Velcro aligns with the bottom of your outline.
- Mark and Cut Your Velcro: Mark your Velcro following the shape of the area to be filled. Cut out the marked strips.
- Duplicate for Opposite Side: If you are placing Velcro on both side of the coat, make exact copies of these strips for the other side. Use the already cut pieces as a guide placing the backsides of the Velcro together.


Step 5: Repeat for Loop Side
- Align and Mark the Inside: Lay the tummy wrap section over the body again, ensuring to cover the outline in the last step. Draw a line onto the inside of the panel following the shape of the coat.
- Lay Velcro in Opposite Direction: To ensure the Velcro pieces overlap correctly, run the loop tape in the opposite direction to the hook side. This alignment gives you the best chance of the pieces connecting securely.
- Calculate Velcro Coverage: Determine how many strips of Velcro you can fit into the width of the tummy wrap section. Measure and mark the strips following the shape of the coat.
- Cut Velcro strips: Cut out your strips. If you are placing Velcro on both side of the coat, make exact copies of these strips for the other side. Use the already cut pieces as a guide placing the backsides of the Velcro together.


Step 6: Sewing Velcro onto the Coat
- Sew the Hook Side: Position the bottom Velcro strip first, then the top, followed by any middle pieces, ensuring even spacing. Repeat for the opposite side of the body.
- Sew the Loop Side: Start with the longest strip on one side of the arms, then the shortest on the other side, followed by any middle strips. Repeat for the other arm.

Final Tips
- Use Quality Velcro: I reccomend using high-quality hook and loop sew-on tape such as this Velcro brand you can purchase on Amazon. It will last longer and provide a more secure hold. Use the Sew On style. Do not use sticky back hook and loop tape as it will pull off over time with use.
- Reinforce the Edges: For added durability, you can sew around the edges of the Velcro pieces a few times or sew with a zig-zag stitch to ensure you have a secure hold.
- Check Alignment: Before sewing, always double-check that the Velcro pieces will align correctly when the coat is fastened.
Remember, practice makes perfect, so try these techniques on different fabrics and designs. If you ever need just a quick refresher check out this Quick Guide to Sewing Velcro on Dog Coats
- The Cozy Coat: A great beginner coat to start with.
- The Slicker Alpine Coat: Perfect for those looking for more of a challenge.
